MSI Afterburner is a completely free overclocking tool that can also record PC gameplay! We found that this recording software had extremely minimal impact on game performance, even when recording at the highest quality settings. This recording software is ideal for those of us who aren’t running supercomputers, but still want to record high-quality footage. We rank MSI Afterburner as one of the best game recorders on the market. Honestly, we can’t believe that it is completely free!
Hardware assessment
This tutorial focuses on modifying the video, audio, and encoding settings to produce the best video output without impacting game performance.
There are minimum hardware requirements you should have when playing and recording resource intensive games in 2017:
- 8gb ram
- i7 CPU
- Game boots on SSD
- Recorded footage stored on a SSD or HDD (SSD is preferred)
- GTX 660
At a bare minimum, I highly recommend upgrading to an SSD if you are still running your game off of a standard hard drive.
Ideally, you should store footage on a SSD drive to reduce instances of recorded footage appearing laggy, broken, or having skipped frames. This is likely due to a problem writing the recorded footage to disk on a standard HDD. You’ll eliminate the chances of this happening by using a SSD.
Unfortunately, the file size of MSI recorded video files are pretty big and will quickly fill up a small SSD.
Luckily, 500gb SSDs are incredibly affordable in 2017, so you could also use one to store your game footage.
Solid state drives offer a fast read/write speed which is essential for recording and playing games. A faster read/write speed means that your game boots up quicker and you’ll load into the map quicker than you would have on a standard hard drive. Encoding and writing files is also much faster compared to a normal hard drive.
Learn how to lock down your technology so you can finally quit p*rn.

You should always record with two hard drives: one to run your game off of and the other to store the recorded footage.
Do not set your file output path to the same hard drive you run your game off of!
If you are close to these minimum requirements, you should still try these settings. Remember, OBS is free!
The Best MSI Afterburner Recording Settings
We found that it is easy to record 1080p footage @60fps with high in-game settings. The frame-drop is almost unnoticeable. The downside is that the file sizes are huge for lossless quality footage, but this is normal. Our settings focus on optimizing audio and video quality while minimizing frame-loss and reducing output filesize. These settings look amazing on Youtube!
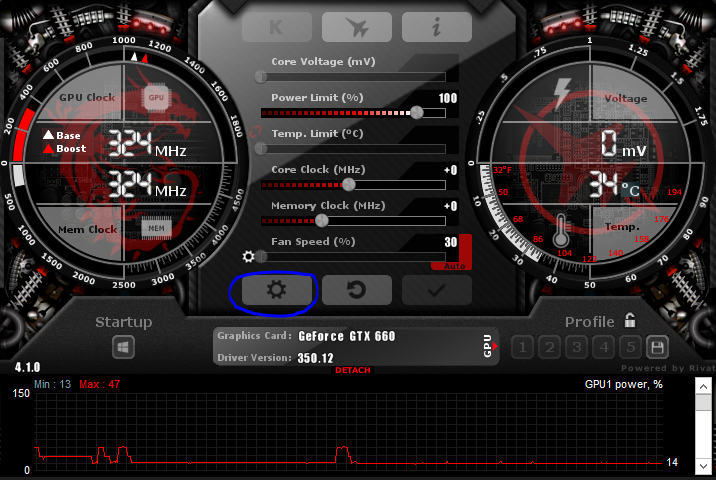
Get started by opening up your MSI Afterburner settings, located here:
Video Settings
Settings>Video Capture
-
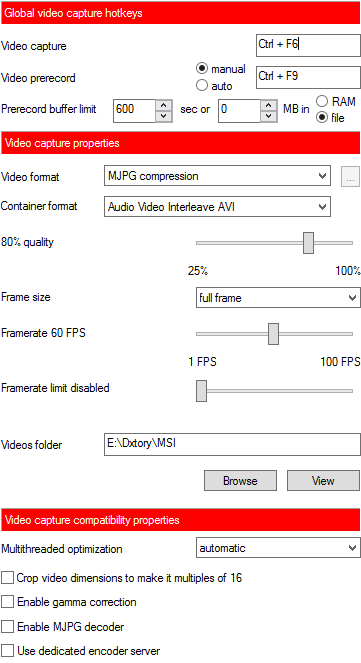
- Video Capture Hotkey: We chose a key combination for the hotkey to reduce keybinding conflicts
- Video prerecord: Pushing the hotkey associated with this essentially records “back in time” based on the buffer limit you designate. This means that you don’t need to record constantly! In this case, pressing the hotkey combination saves a 10 minute clip. Setting the buffer limit file size to 0 means you are not limiting the output filesize for the prerecording. This feature is similar to Shadowmode for ShadowPlay and is one of the coolest features of MSI Afterburner.
- Video format: The compression format for the recorded footage. We use MJPG Compression.
- Container Format: The format of the saved footage. We are saving in the .avi format.
Quality: The quality of the output video. We use 80% quality to reduce the file size (the difference in quality isn’t noticeable)
- Frame size: Full frame means it will record at the full frame rate you specifiy. In this case, we designate a 60fps frame rate, so it will record at 60fps. However, if we set the frame size to half frame, it would record at 30fps instead. Recording at a lower framerate will reduce file size and increase performance.
- Framerate limit: This is used to limit the framerate during video capture, which can result in smoother video playback due to less frame rate fluctuation. We didn’t find it neccessary to use this setting.
- Multithreaded optimization: Usage depends on your processor setup (if you have multiple processors). Setting this to automatic allows MSI to detect the best settings for you. We set this to automatic.
Audio Settings
Found in Settings>Video Capture (scroll down)
-
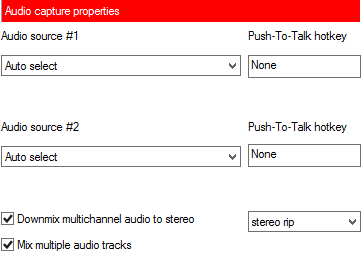
- Audio Sources: Allows you to set two audio sources to record. Set this to your microphone and speaker/headphones. You could also use audio channels setup by an audio splitter.
- Push-to-talk: Setting a push-to-talk hotkey means that your voice will only be recorded when pressing down the hotkey. This doesn’t mean you will need to use the same Push-to-talk hotkey on Teamspeak or Skype. This is useful if you don’t use a push-to-talk hotkey with your VoIP, but don’t want to record your microphone all the time.
- Downmix multichannel audio to stereo: Used to convert your audio stream to stereo. This can improve performance and compatibility with editing software. We recommend using this.
- Mix multiple audio tracks: If you are recording two audio sources, this setting will split the sources into two seperately editable audio streams. If you don’t use this setting audio sources will appear in the same audio channel, so they are not independently editable. We recommend using multi-track audio recording so you can easily adjust and edit your audio sources when editing the footage.
Overlay Settings
Found in Settings>On-Screen Display
-
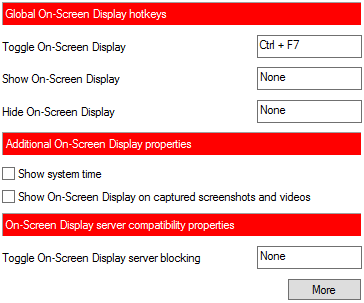
- Toggle On-Screen Display: Turn the recording indicator/FPS counter on/off. We found that this was the only display hotkey needed.
- Show On-Screen Display on captured screenshots and video: Turning this on will make the recording indicator/fps counter overlay visible in your recorded footage. This is useful if you want to show people the framerate you were getting while playing a game. Great for debugging and showing lag-issues.
Learn how to lock down your technology so you can finally quit p*rn.